
Table of Contents
- 1 How to Choose the Best Bread Proofing Box in 2025
- 2 Recommended Top Bread Proofing Boxes 2025
- 2.1 Zojirushi Bread Proofer with Heater, Dough Proofer with Temperature Probe and Window, Proofing Box w
- 2.2 £35.82
- 2.3 Brod & Taylor Proofer, White, Universal
- 2.4
- 2.5 Bread Dough Proofer with Heater, Electric Pizza Dough Proofing Box Temperature Control Proofing Acce
- 2.6 £35.99
- 2.7 Zojirushi Bread Proofer with Heater, Dough Proofer with Temperature Probe and Window, Proofing Box w
- 2.8 £35.82
- 2.9 Folding Proofer & Slow Cooker, Yogurt Maker, Chocolate Melter, Bread Proofing Oven, Fermenter, Multi
- 2.10
- 2.11 Foldable Dough Proofer Dough Fermentation Box, Dough Fermentation Cabinet with Heater, -50-110°C Ac
- 2.12 £35.95
- 2.13 Bread Proofing Box, Dough Proofer With Heater, Sourdough Bread Making Tools Kit, Fold Proofer, Pizza
- 2.14 £55.32
- 2.15 Bread Proofing Box with Heater, Foldable Sourdough Dough Proofer with 33-122℉ Temperature Control,
- 2.16 £68.06
- 3 What is a Bread Proofing Box and How Does it Work?
- 4 How to Choose the Best Bread Proofing Box: A Complete Buying Guide
- 5 Conclusion
- 6 Informative video
- 7 Frequently Asked Questions (FAQs)
How to Choose the Best Bread Proofing Box in 2025
Choosing the right bread proofing box for your home baking comes down to matching the features of the unit with your specific needs. For most home bakers across the UK, the best choice is usually an electric model that provides precise and adjustable temperature control, an easy way to manage humidity, and a capacity that suits your typical bakes—whether that’s a single large sourdough boule or a couple of sandwich loaves. Value for money is important too, so look for a dependable, easy-to-clean design that will serve you well for years.
If you’ve ever felt frustrated by an under-proofed, dense loaf or dough that stubbornly refuses to rise on a chilly British morning, a bread proofing box could be just the game-changing baking tool you need. This simple yet clever device—also known as a dough fermentation box or bread rising container—removes the guesswork from the most vital stage of bread making: the rise. By creating a steady, warm environment, it lets you achieve consistent, professional-quality results every time, no matter the temperature in your kitchen. Whether you’re an experienced sourdough baker or just starting out, picking the right model is essential to unlocking the full potential of your bread.
Recommended Top Bread Proofing Boxes 2025
Taking into account the advice shared here, combined with buyer feedback and what’s available on the market, we suggest these Bread Proofing Box models as top choices for cost-effectiveness.


What is a Bread Proofing Box and How Does it Work?
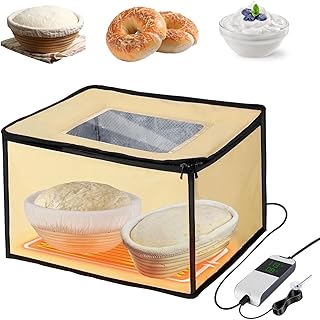
At its simplest, a bread proofing box is a sealed container made to keep a steady temperature and humidity level, creating the perfect environment for dough fermentation. Think of it like a mini incubator designed especially for your bread dough. Yeast—the fascinating microbe that makes bread light and airy—can be quite particular. It performs best within a warm, moist temperature range, usually between 24°C and 28°C (75°F to 82°F).
A good dough fermentation box removes the environmental factors that can get in the way. On a cold day, it gently warms the dough to just the right temperature, encouraging the yeast to activate and create carbon dioxide, which makes the dough rise. It also keeps humidity high, which stops a dry ‘skin’ from forming on the dough’s surface. This skin can prevent the dough from expanding properly, resulting in a denser, less appealing loaf. By controlling temperature and humidity, a bread rising container guarantees a dependable, predictable, and superior rise every time you bake.
How to Choose the Best Bread Proofing Box: A Complete Buying Guide
Searching for a new baking accessory can feel a bit overwhelming, but finding the right bread proofing box is easier than you might think. It’s all about recognising your baking habits and focusing on the features that will make the biggest difference to your results. Being practical and concentrating on reliability and long-term value will guide you to the best purchase. Let’s look at the key things to consider so you can pick the perfect dough fermentation box for your kitchen.
1. Type of Proofing Box: Electric vs. Non-Electric
The first big decision is whether to go for an electric or a non-electric model. This choice greatly impacts performance, convenience, and cost.
Electric Bread Proofing Box
Electric models are the most popular and effective for consistent results. They have a low-wattage heating element, usually at the base, controlled by a thermostat. This gives the crucial temperature stability that’s tricky to achieve otherwise.
Pros:
- Precise Temperature Control: The main advantage. You can set an exact temperature and rely on the box to keep it steady, removing all the guesswork. This is especially helpful in the UK, where kitchen temperatures can change widely through the day and seasons.
- Consistency: By taking temperature out of the equation, you get uniform rise times and dough development every time you bake, making recipes far more reliable.
- Versatility: Many electric models work for other uses too, like making yoghurt, tempering chocolate, or keeping plates warm.
Cons:
- Cost: They tend to be more expensive upfront than non-electric ones.
- Power Requirement: They need to be plugged in and use a small amount of electricity.
- Size: Usually bigger because of the built-in electronics and heating parts.
From my own experience, if you’re serious about consistent baking, an electric bread proofing box quickly pays for itself through reliable results and less wasted ingredients.
Non-Electric Bread Rising Container
Non-electric models are basically insulated boxes. To keep warm, you usually add an outside heat source like a jug of hot water or a microwavable heat pad. The insulation helps trap this warmth for as long as possible.
Pros:
- Affordability: Much cheaper to buy.
- Simplicity: With no electrical parts, there’s less that can go wrong.
- Portability: Lightweight and don’t need a power supply nearby.
Cons:
- Inconsistent Temperature: It’s tough to keep a steady temperature. The warmth fades over time, so you’ll need to refresh the heat source, which can be fiddly. This lack of temperature stability is the biggest downside.
- Less Reliable: Results are much less predictable than with electric models.
A non-electric bread rising container might suit a very casual baker, but if you want to fix issues with unreliable proofing, an electric version is the better option.
2. Size, Capacity, and Storage
The size of your bread proofing box matters a lot. You want one big enough for your typical bakes but small enough to fit comfortably in your kitchen.
Internal Capacity
Think about what you usually make. Do you bake large, rustic sourdough boules in a round banneton, or do you prefer baking two 1lb loaf tins at once? Be sure to check the internal measurements of the dough fermentation box before you buy.
- Single Loaf Baker: A smaller model will do. Aim for an internal space of at least 25cm by 25cm to fit a standard mixing bowl or banneton comfortably.
- Batch Baker: If you often bake more than one loaf, you’ll need a bigger bread proofing box. Some can hold two 1lb or 2lb loaf tins side-by-side. Measure your tins carefully to be certain.
- Vertical Height: Don’t forget height! Make sure there’s room for your dough to double or triple in size without touching the lid. A minimum internal height of 20cm is a good rule of thumb.
External Footprint and Storage
UK kitchens can be quite small. A common mistake is buying a bulky appliance you have nowhere to put. This is where collapsible designs can be a real lifesaver.
Collapsible Models: Many popular electric proofing boxes fold down to a fraction of their full size. The walls often detach and fit inside the base, letting you store the whole unit in a drawer or a narrow cupboard. For anyone short on space, a collapsible bread rising container is almost essential.
Rigid Models: Some boxes are fixed plastic or metal. They’re very hard-wearing but can be awkward to store. If you have a large pantry or utility room to keep one permanently, that’s fine. Otherwise, make sure you measure your cupboard carefully before buying.

3. Temperature Control and Range
The quality of the temperature control system is what sets a top-notch bread proofing box apart from a mediocre one. This is the heart of the machine.
Precision and Stability
The main goal of a dough fermentation box is steady temperature stability. Look for models with a digital thermostat, letting you set temperature precisely, usually in one-degree steps. Analogue dials aren’t as accurate and offer less control.
A useful tip is to read user reviews to see how well the box keeps its set temperature. Some cheaper models can fluctuate by several degrees, which works against what the proofing box is meant for. High-quality boxes hold the temperature steady, helping your dough develop at a steady, reliable pace.
Temperature Range
For most bread doughs, the ideal temperature is between 24°C and 28°C. But having a wider range makes your bread box more versatile.
- Lower Temperatures (21-24°C): Great for slower, more flavoursome fermentation, especially for sourdough, which develops complex sour notes.
- Higher Temperatures (up to 45°C or more): Although not usually needed for bread, this is useful for making homemade yoghurt, which requires about 40-45°C.
A range from roughly 20°C to 50°C hits a perfect middle ground, covering all proofing needs plus extra culinary projects.
4. Humidity Control
Along with temperature, humidity is the second key environmental factor for perfect proofing. Good humidity control stops the dough surface drying out.
Why Humidity Matters
You want your dough to stay soft and flexible on the surface when it proofs. If the air is too dry, a crust or ‘skin’ develops. This tough layer acts like a corset, restricting the dough’s ability to expand. It results in a poor ‘oven spring’—the final rise when the bread hits the hot oven—and a dense, tight crumb.
Methods of Humidity Control
Most home-use bread proofing boxes use a simple but effective method to add humidity.
- Water Tray: The most common design includes a small tray resting on the heated base of the box. You add a few tablespoons of water, and as the base warms, the water slowly evaporates, creating a warm, moist atmosphere inside the sealed bread rising container. It’s straightforward, efficient, and easy to manage.
- Integrated Systems: Professional-grade units might have more advanced humidity controls, but for home use, a water tray is entirely sufficient and easy to clean.
When choosing, make sure the unit has a dedicated water tray that’s simple to insert and remove without spills. This feature is essential for any serious baking accessory of this kind.
5. Material, Build Quality, and Ease of Cleaning
A sensible shopper wants a product that lasts and is simple to keep clean. The materials and build quality of your bread proofing box will affect how long it lasts and how troublesome cleaning it is.
Materials
Most modern bread proofing boxes are crafted from high-quality, food-safe plastics.
- Plastics (Polypropylene): This is an ideal material—lightweight, a good insulator, tough, and easy to wipe clean. Look for models that specifically say they’re BPA-free for peace of mind.
- Viewing Window: Many have a clear plastic lid or window on top. This is really useful because you can see how your dough is doing without opening the box and losing heat and humidity.
- Metal Parts: The heating plate at the base is usually aluminium, selected for excellent heat distribution. Make sure it has a non-stick or easy-clean coating.
Ease of Cleaning
Baking can get messy, with flour and sticky dough bits everywhere. A dough fermentation box that’s difficult to clean will soon be neglected.
From my experience, the easier an appliance is to clean, the more you’ll use it. Look for:
- Removable Parts: In collapsible models, walls and lids often come off completely, making washing by hand easy.
- Smooth Surfaces: Avoid boxes with awkward corners or nooks where dough might get trapped. Smooth surfaces wipe down well.
- Dishwasher-Safe Components: Check if smaller parts like the water tray or wire rack are dishwasher-safe. The main unit never will be, but having some dishwasher-friendly bits saves time.
6. Value for Money and Energy Efficiency
For the practical British shopper, buying a bread proofing box is an investment. It’s not only about the purchase price but the overall value over time.
Price vs. Features
Prices for bread proofing boxes vary from around £50 for basic models up to over £150 for premium ones. The price usually reflects thermostat precision, build quality, and size.
- Entry-Level (£50-£80): These will do the job but might have less accurate temperature control and simpler construction. Ideal if you’re on a budget.
- Mid-Range (£80-£150): The sweet spot for most home bakers. You’ll find dependable, collapsible boxes with precise digital thermostats, good capacity, and handy features like viewing windows. This balances price and performance well.
- Premium (£150+): These models often have larger capacity, sturdier build, and potentially a wider temperature range. Best for semi-professional or very committed home bakers.
Long-Term Savings
Think about long-term value. A reliable bread proofing box prevents failed bakes caused by poor proofing. This means less wasted flour, yeast, and electricity. Plus, consistently making great artisan bread at home saves a lot compared to buying from bakeries. Over time, the device more than pays for itself.
Energy Efficiency
With energy prices rising, efficiency is important. The good news is this type of baking accessory uses very little power. The low-wattage heating elements often use less electricity than a normal light bulb. Thanks to good insulation, the heater only kicks in occasionally to keep the temperature, so running costs are tiny—just a few pence per bake.
Conclusion
A bread proofing box is more than just a gadget; it’s a tool for consistency. For home bakers in Britain, struggling with unpredictable kitchen temperatures, it’s the single best way to control your dough’s fermentation. It turns bread making from a bit of a lottery into a repeatable science, making sure your time and ingredients result in beautifully risen, tasty loaves every time. By taking temperature out of the equation, you can concentrate on what really counts: improving your skills and enjoying the art of baking.
When deciding, start by honestly assessing your needs. How often do you bake and in what quantity? For most people, a mid-range, collapsible electric model with precise digital temperature control and a simple water tray for humidity strikes the best balance of performance, convenience, and value. Double-check internal size, prioritise ease of cleaning, and you’ll have a dependable baking companion for many years. Now you’re ready to choose the best bread proofing box and finally achieve the consistent, bakery-quality results you’ve been aiming for.
Informative video
Frequently Asked Questions (FAQs)
Do I really need a bread proofing box?
While not absolutely essential, a bread proofing box is a highly recommended baking accessory for anyone wanting consistent results. If you live in a home where temperatures fluctuate or your dough often struggles to rise, a proofing box will fix this problem completely. It removes the biggest variable in bread making—temperature—allowing for predictable rise times and improved dough structure. For serious bakers, especially sourdough enthusiasts, it shifts from being a ‘nice-to-have’ to a true ‘game-changing’ tool.
Can I use a bread proofing box for sourdough?
Absolutely! A dough fermentation box can be even more useful for sourdough than for commercial yeasted breads. Sourdough depends on wild yeasts and bacteria, which are very sensitive to temperature. A proofing box lets you maintain the precise temperature needed to balance yeast and bacterial growth. You can set it a bit cooler (for example, 22-24°C) to encourage a slower, more complex ferment, or warmer (such as 26-28°C) for a quicker rise with less sourness. Having this level of control is invaluable when mastering sourdough.
What is the ideal temperature and humidity for proofing bread?
The ‘sweet spot’ for most bread doughs is a temperature between 24°C and 28°C (75°F to 82°F). Within this range, yeast is very active, enabling a strong and timely rise. For humidity, you don’t need a precise percentage but rather an environment moist enough to prevent a skin from forming on the dough. Using the water tray inside your bread rising container usually does the job. The warm, humid air keeps the dough’s surface soft, allowing it to expand fully.
How do I clean my dough fermentation box?
Cleaning a modern bread proofing box is generally straightforward. Always unplug and let it cool before cleaning. The base containing electronics should only be wiped with a damp cloth—never submerged. For collapsible models, the plastic walls and lid can usually come off and be hand washed in warm, soapy water. The water tray and any wire racks should also be cleaned this way. Make sure all parts are completely dry before reassembling and storing to avoid mould or mildew.
Can a bread rising container be used for other things?
Yes, many electric models are quite versatile. One common alternative use is making homemade yoghurt, which requires milk to be held at a steady temperature around 40-45°C for a few hours—perfect for a bread proofing box with the right temperature range. Some also use them for tempering chocolate, which needs gentle, consistent heat, or for keeping food or plates warm before serving. Their excellent temperature stability makes them useful beyond bread making.


